Linked List in Go
Welcome to my new series: Introduction to Data Structures in Go! We will start this series with a post about linked lists. If you are a student majoring in computer science, you probably have run into these in your class. Not only are linked lists a part of the CS curriculum, but are also a very popular topic in coding interviews, so it is desirable to have a solid grasp on this topic. Let’s get started!
What is a linked list?
A linked list is a data structure used to store many data. The basic structure consists of multiple nodes that are linked to each other by pointers. A node typically consists of stored data and a pointer to the next node.
.png)
We step into the list by following the pointer to the first node, also known as the head. Don’t get confused - there are only three nodes in the diagram above. The first item HEAD is merely a pointer to the first node. The last node points to NULL, which signals the end of the list.
Linked lists are used to, well, store data. However, they are also the backbone of more complex data structures such as stacks and queues. The idea of linking each node with pointers also carries over to other data structures such as trees and graphs.
Linked list vs. Arrays
You may be wondering, “Why do we even have to learn this data structure? Don’t we have arrays? Aren’t we just reinventing the wheel here?” There is a case to be made for arrays, but arrays and linked lists are structurally different.
Arrays are initialized before the program is compiled. It needs a certain block of memory allocated to it.
.png)
Arrays are great when you have to find elements. Each item in the array has an index, and we can find the nth element quickly by accessing it using myArr[n].
The problem here is that arrays cannot be re-sized on run-time. This means that we cannot change its size after we run the program. If our array is given four blocks of memory, that means that we can’t store more than four items. One way to overcome this issue is to create a new array twice as big as our original array and copy all the elements over.
.png)
Go slices are implemented this way. The problem with this approach is that copying large amounts of data is inefficient, and we still have a lot of empty space left over.
Linked lists aim to solve this problem by connecting nodes that are scattered across our memory via pointers. This way, we don’t need to know the size of our list in advance. If we want to add a new node, we just have to create one and link it.
While there is no wasted memory here, the issue is that each data point requires more memory than arrays, because it has to store the pointer to the next node as well. Plus, in order to search for an element at index n, we need to traverse through the list until we reach the nth position. Each node only knows about the existence of the next node, so we can’t access the nth element right from the get-go.
Go implementation
Let’s look at how we can create a linked list in Go.
type Node struct {
    data int
    next *Node
}
This is how a node is defined. Each node holds data and a pointer to the next node. We will store int data for this guide, but you can easily switch this to other types. We can even use interface{} to store data of any type we want.
type LinkedList struct {
    head *Node
    length int
}
This is how a linked list is defined. The most important part of this is the head, which stores the pointer to our first node. Other attributes are optional but can be very helpful. We are adding the length attribute that stores the length of our linked list.
package main

import (
    "fmt"
)

func main() {
    list := LinkedList{nil, 0}
}
We can initialize our linked list this way. The initial length is zero because there are no nodes in our list yet. The head points to nil because there are no nodes to point to.
Now we can define struct methods to insert and delete nodes.
Insertion
We can think of three main cases here: inserting at the head, the tail, and an arbitrary position.
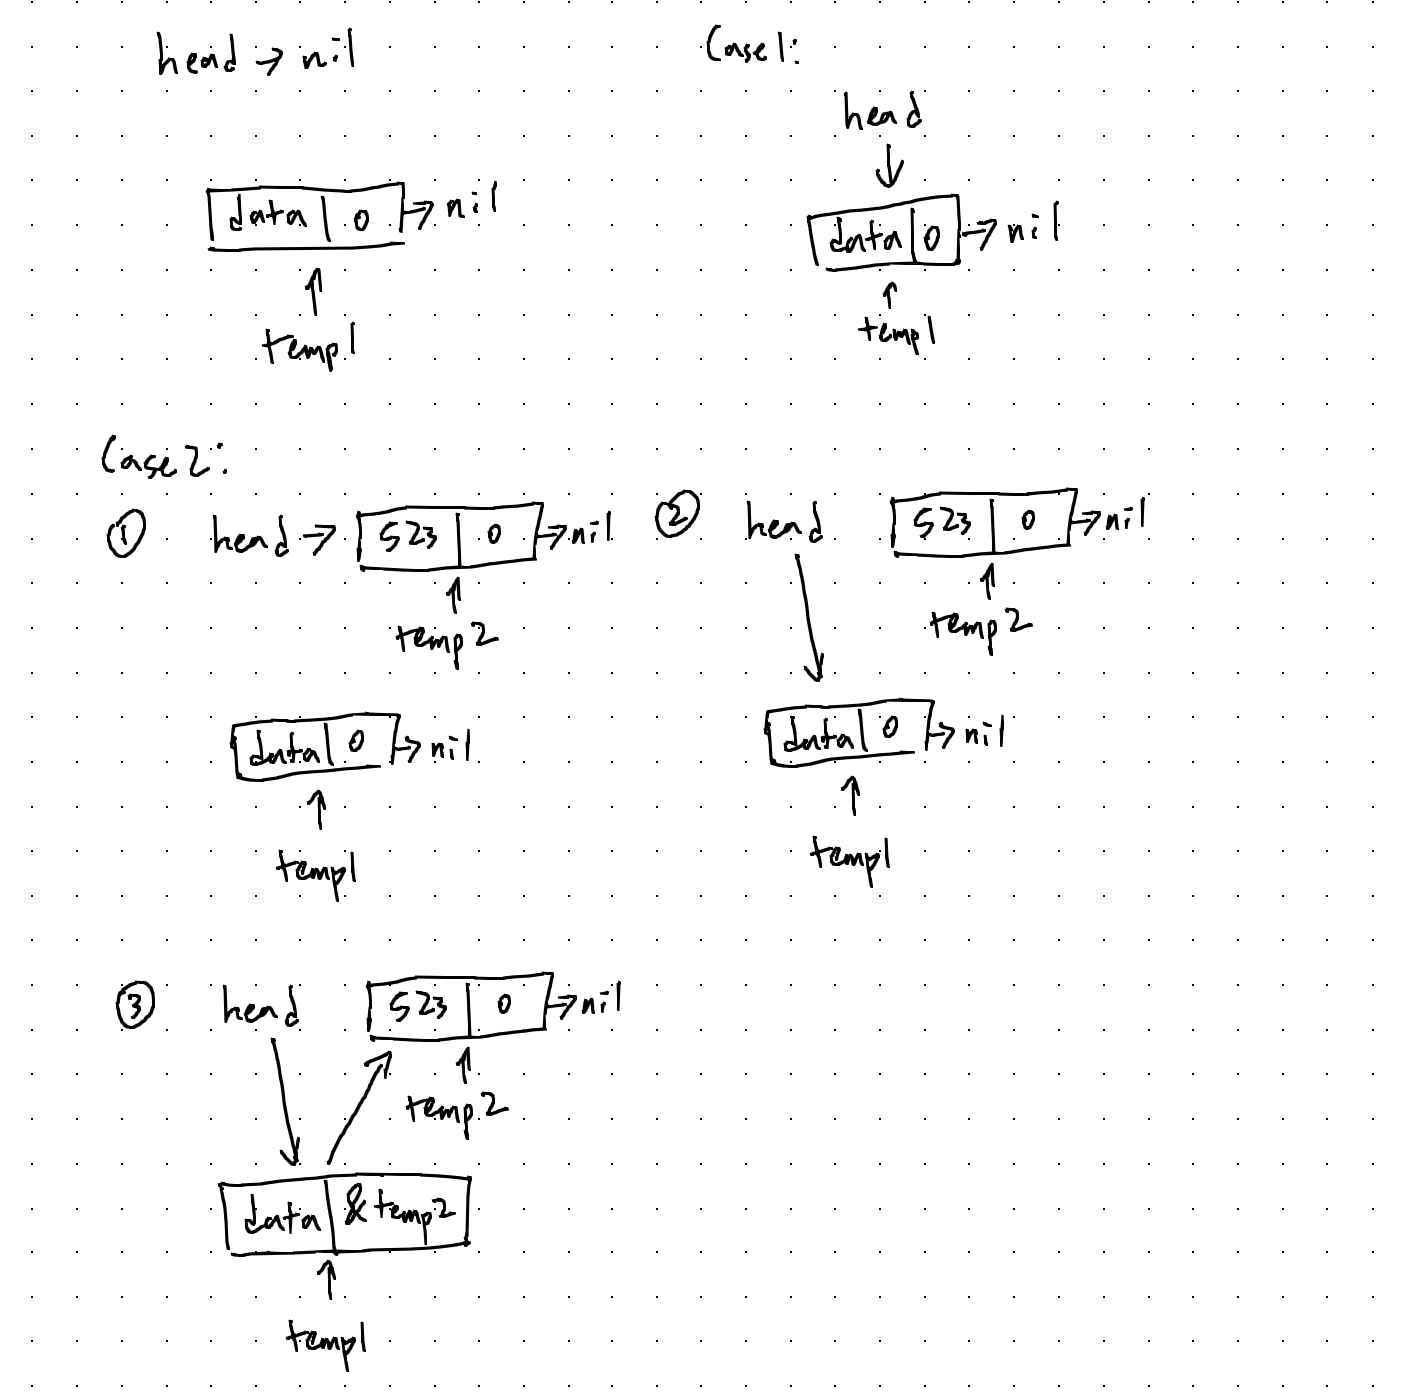
func (l *LinkedList) insertAtHead(data int) {
    temp1 := &Node{data, nil}

    if l.head == nil {
        l.head = temp1
    } else {
        temp2 := l.head
        l.head = temp1
        temp1.next = temp2
    }
    l.length += 1
}
This struct method is defined using a pointer to our LinkedList object because we need to make changes to it.
We first create a node and save a pointer to it as temp1. This node stores our given data and initially points to nil.
There are two cases we need to look out for. The first case is when the list is empty. In this case, we just set head to point to the node we just created.
The second case is when the list is not empty. This means that head is already pointing to some node. We need to adjust that so that the head points to our new node and the new node points to the node that the head used to point to.
-
We first save a copy of
headastemp2. -
Then we set the
headto point totemp1. -
Finally, we set
temp1to point totemp2.
I drew a diagram below to help you understand the logic.
In the end, we increment the length by one.
How about inserting nodes at the tail (end)?
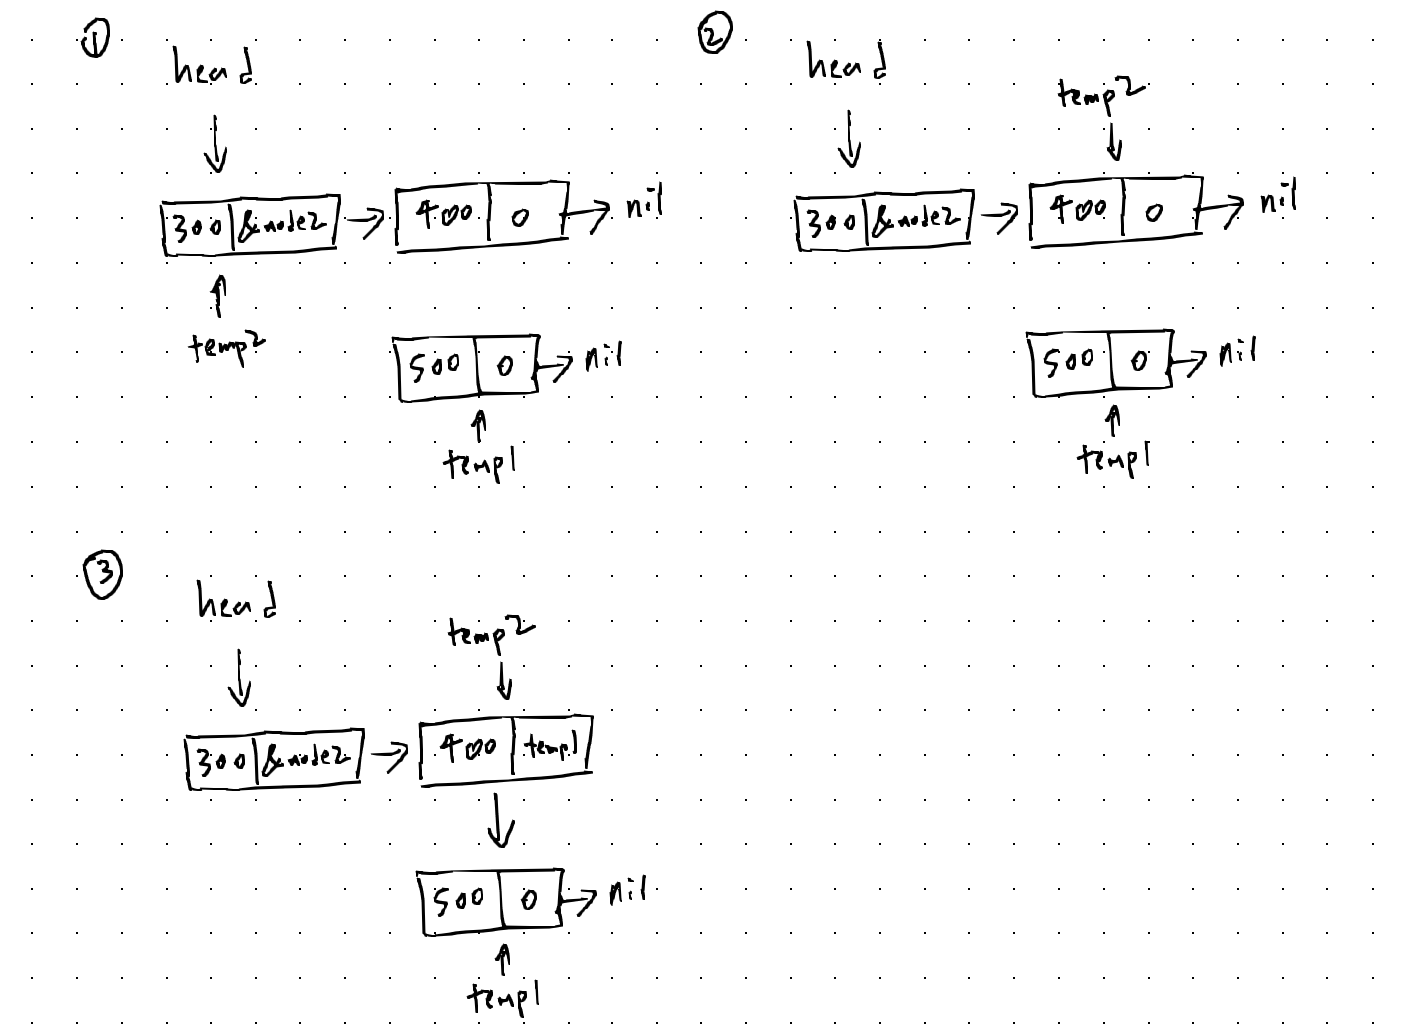
func (l *LinkedList) insertAtTail(data int) {
    temp1 := &Node{data, nil}

    if l.head == nil {
        l.head = temp1
    } else {
        temp2 := l.head
        for temp2.next != nil {
            temp2 = temp2.next
        }
        temp2.next = temp1
    }
    l.length += 1
}
This is pretty simple as well. We create a new node and save the pointer to it as temp1. Here, we also have to handle the case where the list is empty. The steps are the same as above.
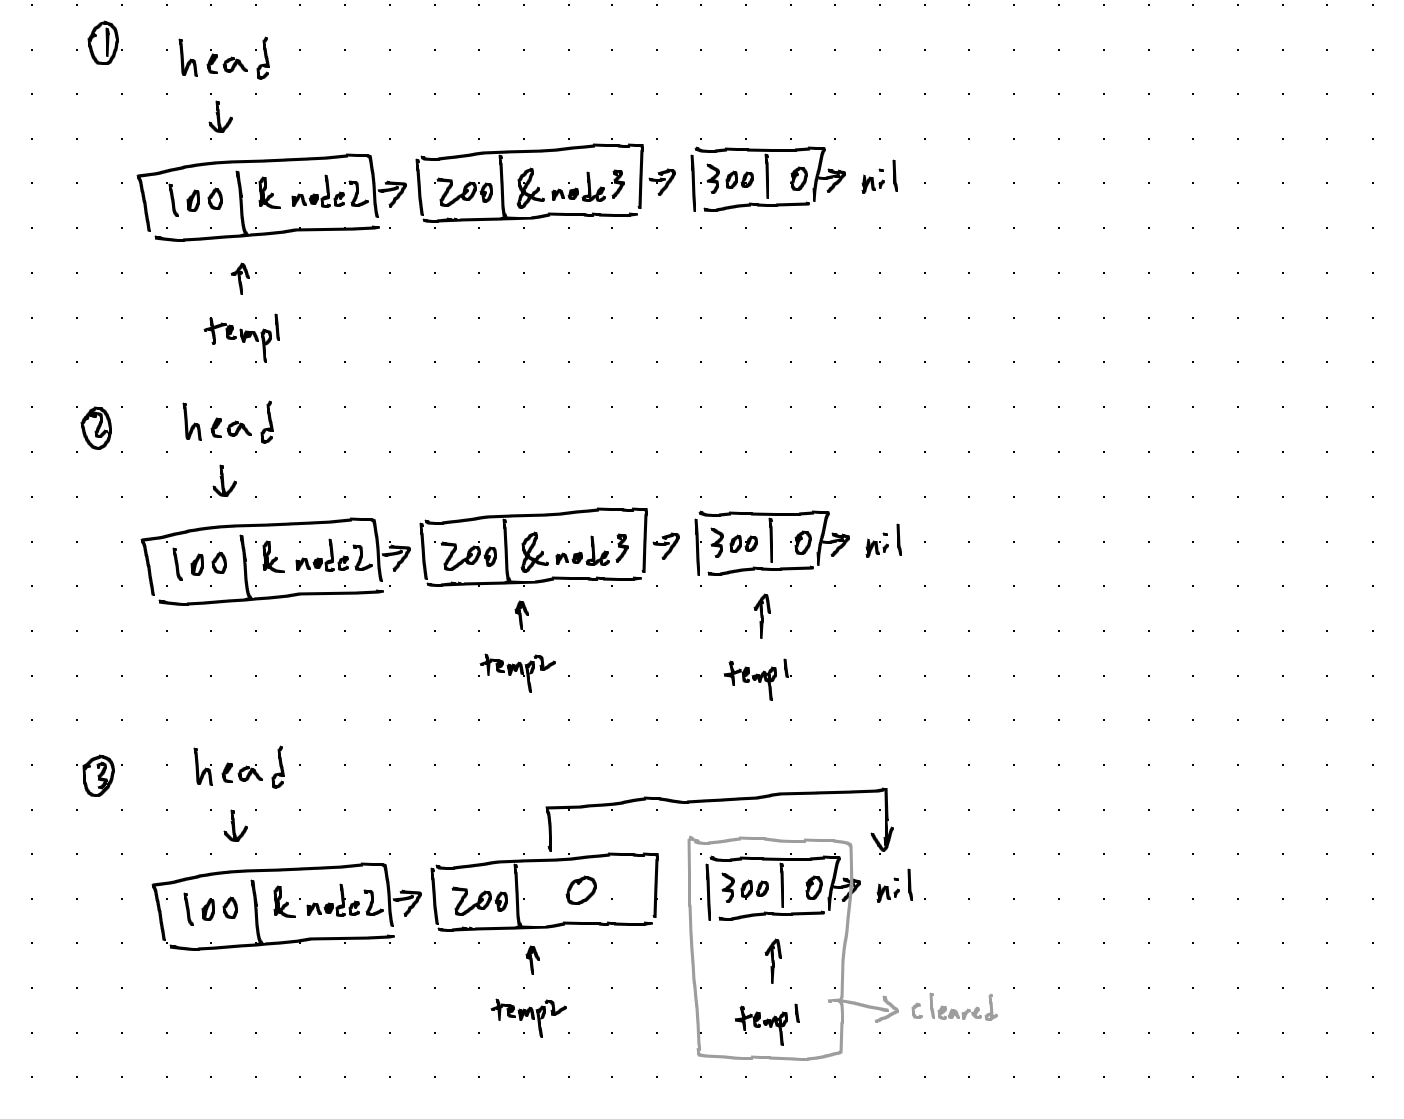
Now the interesting part: in order to insert an element at the back of the list, we need to traverse through the entire list until we reach the last element. Without this step, there is no way to access the last element.
-
We first create a copy of
headastemp2. -
We iterate through the list by setting
temp2astemp2.next. We continue this untiltemp2.nextisnil, which means thattemp2is pointing to the last node. -
Simply, have the last node point to the same node that
temp1is pointing to.
Here’s a diagram that explains how it all works. We are going to use a lot of diagrams because they can help our understanding immensely.
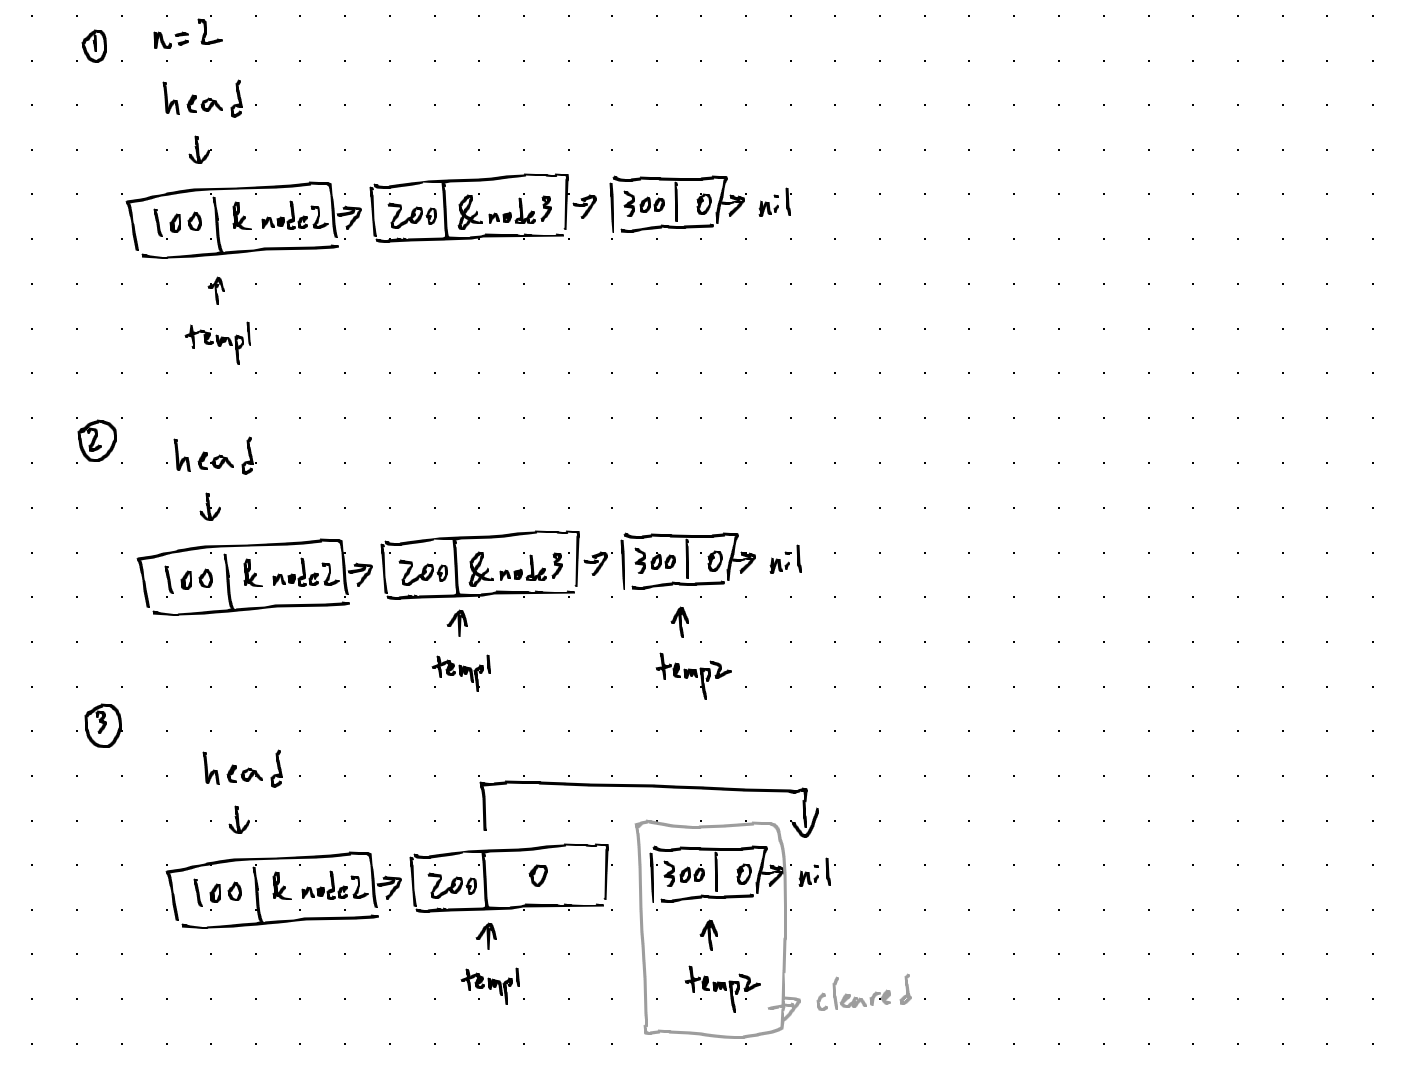
Finally, let’s look at how we can insert data at an arbitrary location.
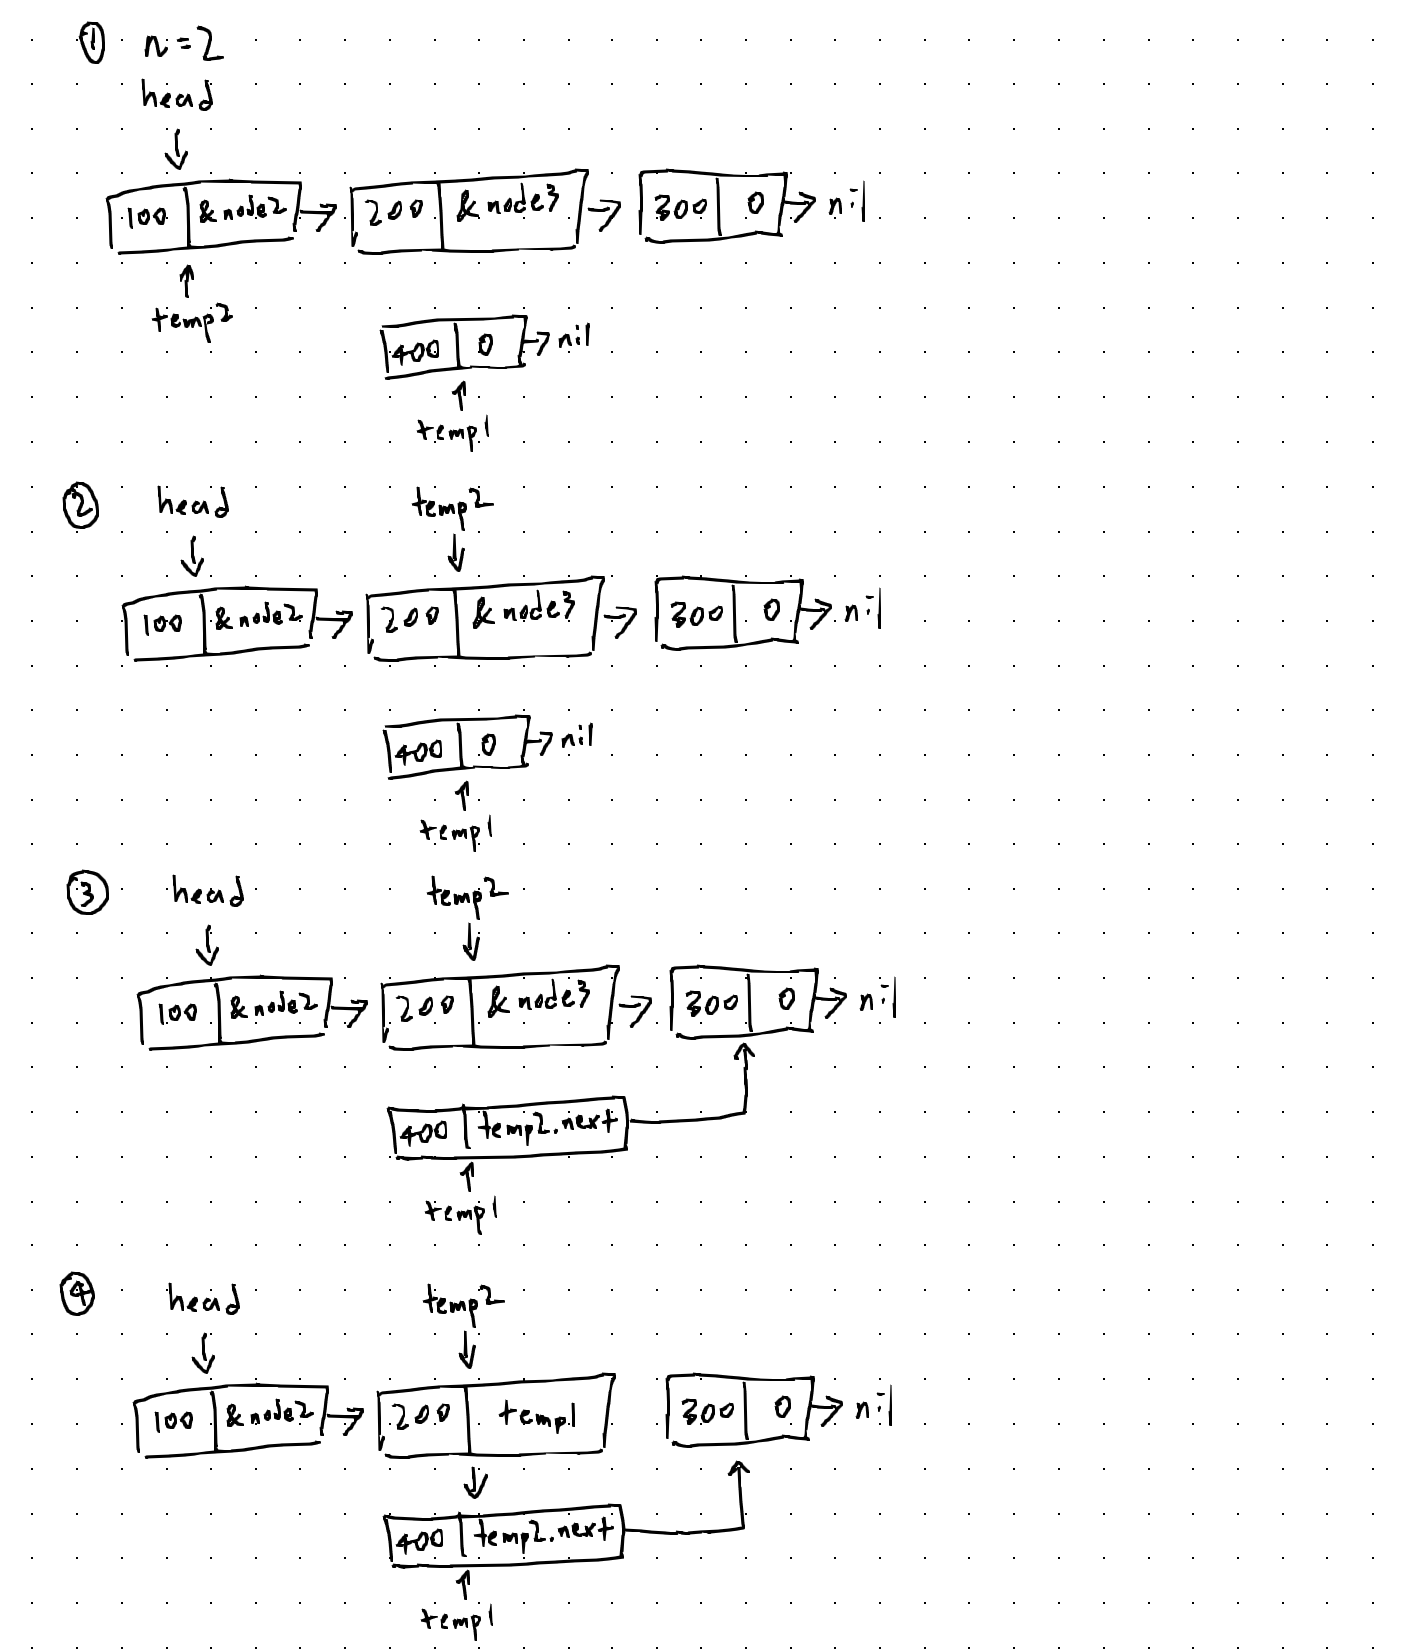
func (l *LinkedList) insert(n, data int) {
    if n == 0 {
        l.insertAtHead(data)
    } else if n == l.length-1 {
        l.insertAtTail(data)
    } else {
        temp1 := &Node{data, nil}
        temp2 := l.head

        for i := 0; i < n-1; i++ {
            temp2 = temp2.next
        }
        temp1.next = temp2.next
        temp2.next = temp1
    }
    l.length += 1
}
The logic here is pretty similar to the above two functions.
-
When we want to insert at the beginning or the end of the list, we can call
insertAtHead()orinsertAtTail()instead. -
To insert data at the nth position, we need to traverse through the list to reach the n-1th position.
-
Once we reach the n-1th position, we set
temp1.next, the pointer to our new node, to point to the n+1th position. We then settemp2to point to our new node.
You know the drill by now. :)
Deleting items
Now that we understand how the whole pointer manipulation shenanigan works, we can more easily understand how deletion works. We will split this into three cases as well: deleting items at the head, the tail, and an arbitrary position.
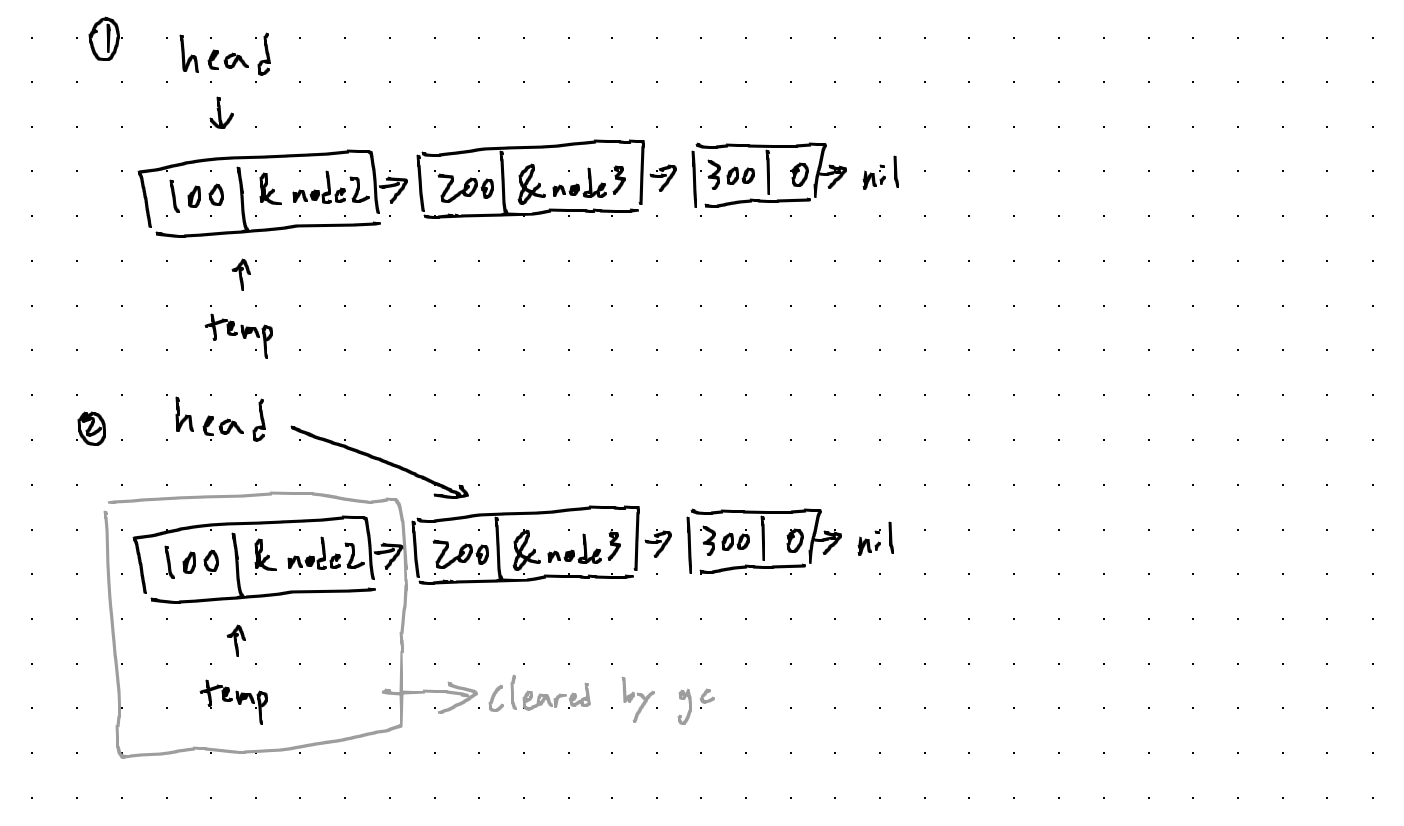
func (l *LinkedList) deleteAtHead() {
    temp := l.head
    l.head = temp.next

    l.length -= 1
}
This is how you delete the first item in the list. We just need to change the head so that it points to a second node. You might think that the first node stays in the memory unless we explicitly clear it, but we don’t. Go’s built-in garbage collector will clear this for us.
func (l *LinkedList) deleteAtTail() {
    temp1 := l.head
    var temp2 *Node
    for temp1.next != nil {
        temp2 = temp1
        temp1 = temp1.next
    }
    temp2.next = nil

    l.length -= 1
}
This is how you delete the last item in the list. The logic is familiar:
-
We iterate through the list until we reach the last node. This time, however, we keep track of the node right before
temp1as well. -
We set
temp2to point tonilinstead oftemp1. The last node will be cleared by the garbage collector.
func (l *LinkedList) delete(n int) {
    if n == 0 {
        l.deleteAtHead()
    } else if n == l.length-1 {
        l.deleteAtTail()
    } else {
        temp1 := l.head
        for i := 0; i < n-1; i++ {
            temp1 = temp1.next
        }
        temp2 := temp1.next
        temp1.next = temp2.next
    }
    l.length -= 1
}
Finally, let’s look at how to delete an item at an arbitrary position.
-
If deleting the first or last item, we can use
deleteAtHead()anddeleteAtTail()instead. -
The logic is very similar to
deleteAtTail(). We traverse through the list until we reach the n-1st node. We settemp2to point to the nth node. -
We set
temp1.nextto point totemp2.next, which effectively removes the link between the n-1th and nth elements.
Congratulations! We now know how to create a linked list, insert a node, and delete a node. Let’s go a step further.
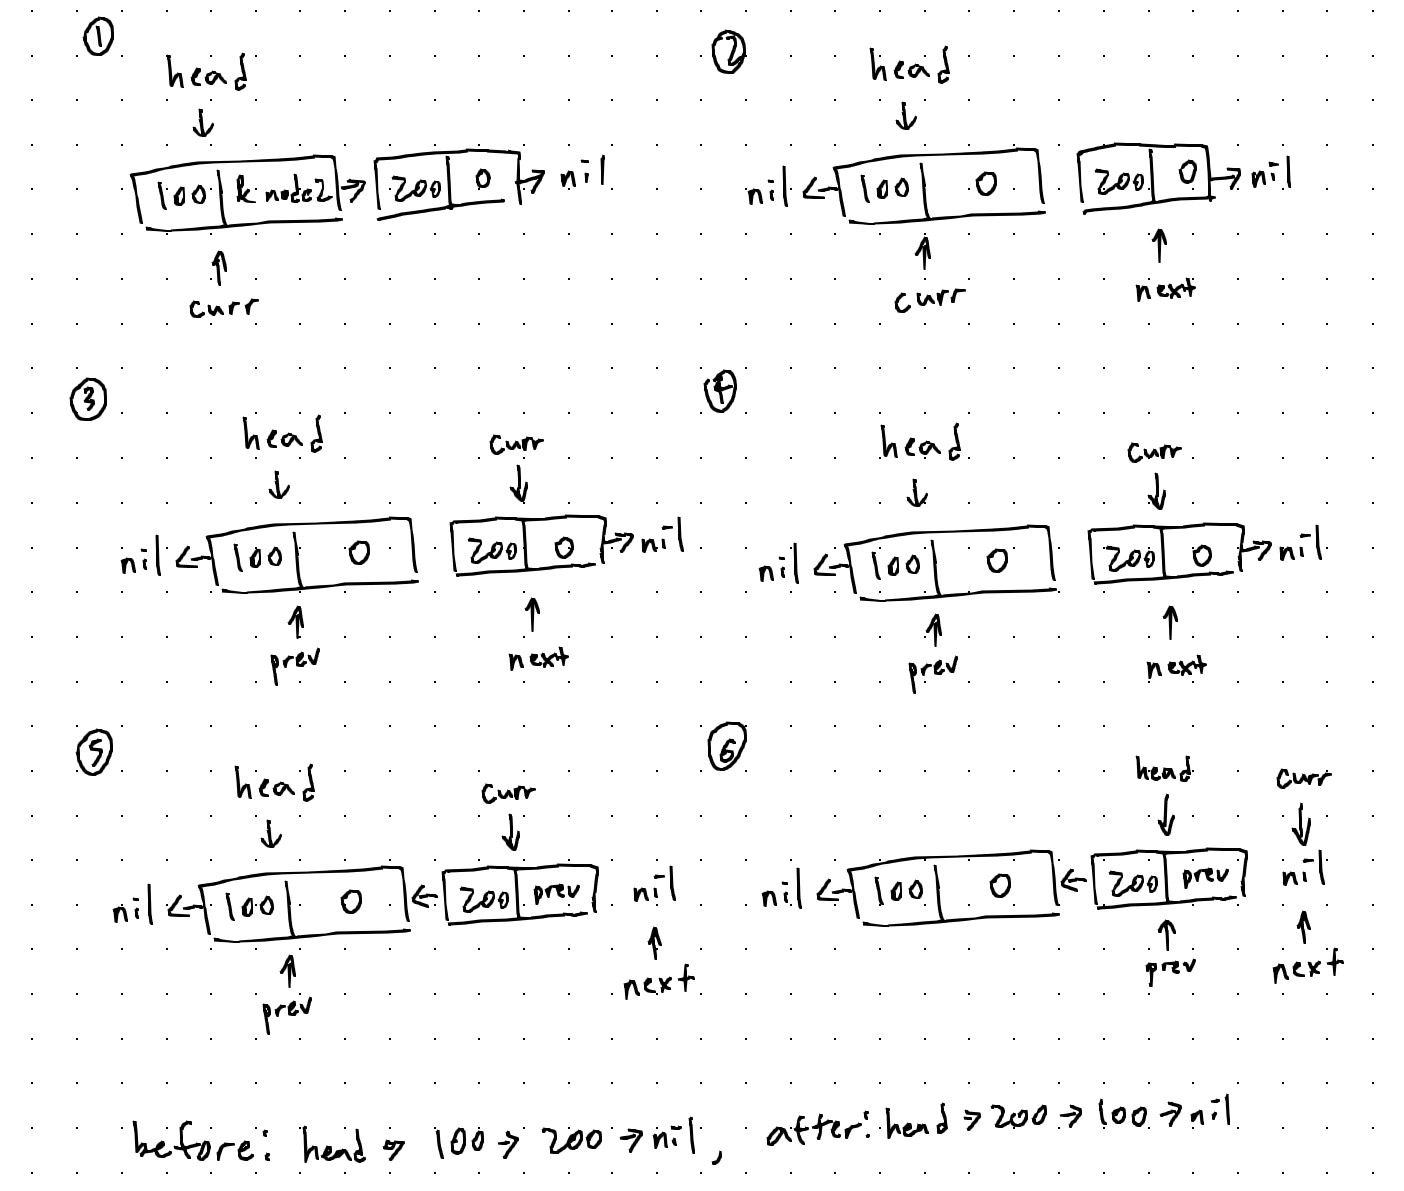
Reversing a linked list
It is useful to be able to reverse our list. Let’s look at how we can do this.
func (l *LinkedList) Reverse() {
    var curr, prev, next *Node
    curr = l.head
    prev = nil

    for curr != nil {
        next = curr.next
        curr.next = prev
        prev = curr
        curr = next
    }
    l.head = prev
}
It’s faster to look at the diagram than for me to explain the steps in plain words.
Conclusion
A linked list is a useful data structure that is easy to implement. To beginners, linked lists could be challenging because it is the first time where pointers are used extensively. I hope this guide helped you understand how a linked list works. I wish you the best of luck in your studies!